Tenant-to-Tenant – PST based Exchange Migration automation approach – Part IV

This is the fourth article from a series in which I show a way how to use a pst based approach for a Tenant-to-Tenant Exchange Online migration. In the last article, we prepared the import Job by uploading masses of PST’s to an Azure Container. Today I will share how to import the PST Files from that container into the destination mailboxes.
Mapping File
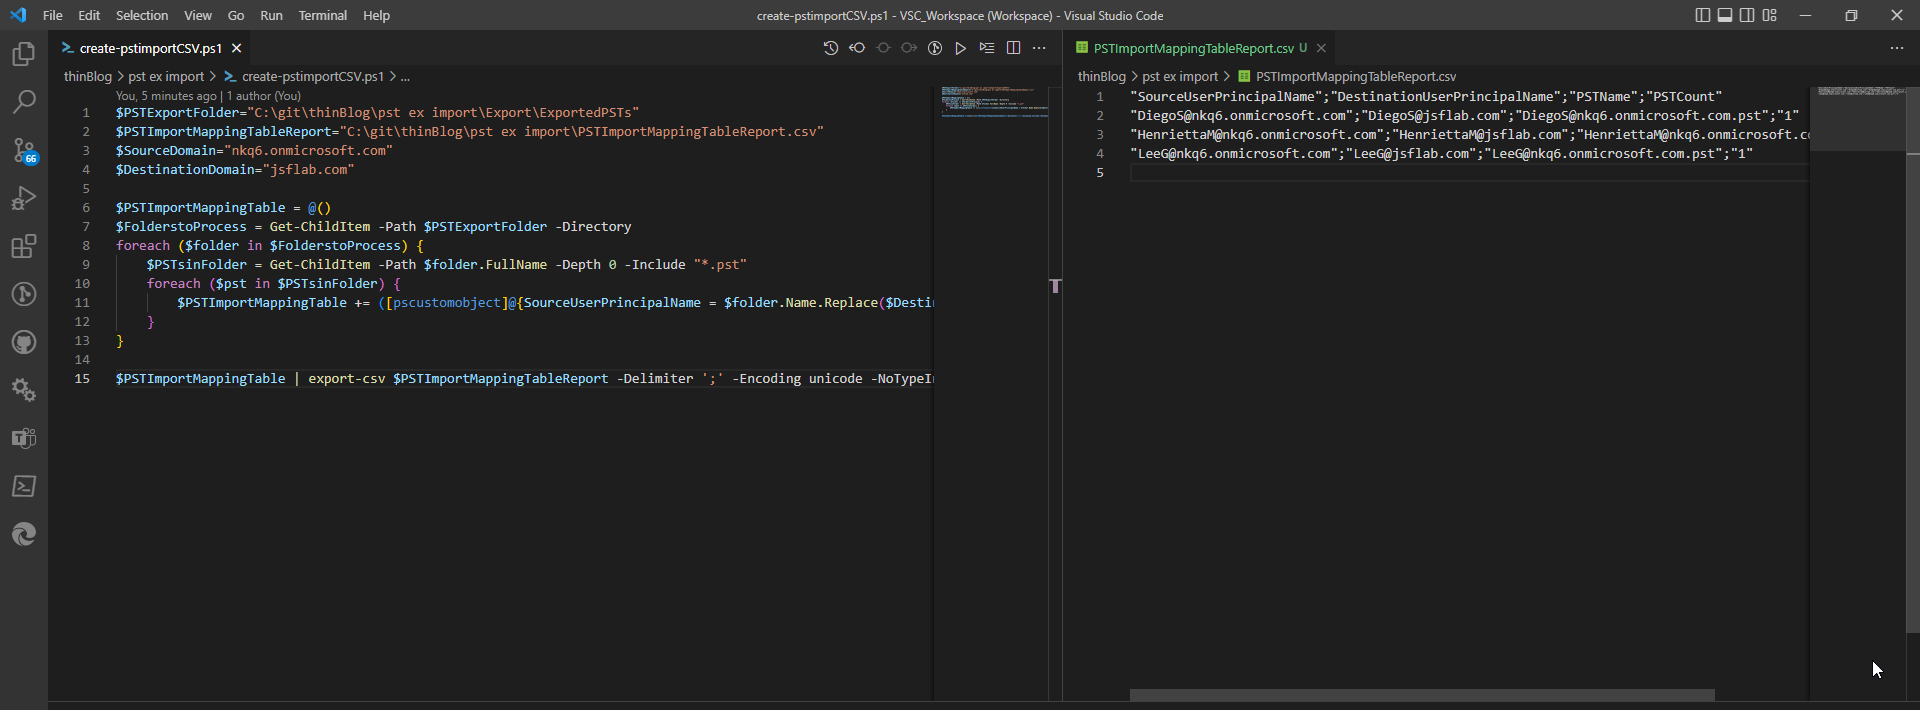
We create a mapping file first. This file should help to map a pst file to a destination mailbox. It could be reviewed and edited before the import is started to be able to work with exceptions etc. If you have used the previous articles to generate and upload the PST Files, then you have a local instance of all pst files which can be used to generate the mapping file. The PST Files were named like the Destination User UPN and the containing Folders were named like the Source User UPN.
You can use PowerShell to create a CSV from this content. I’ve shared the script here: thinBlog/create-pstimportCSV.ps1 at main · thinformatics/thinBlog (github.com). Just edit the variables accordingly and start it. The result is a CSV that contains an entry for every PST in the PSTExportFolder with information about the source and target. Please review the results and add manual entries etc if you want. Be aware that the PST Filename is case-sensitive if you edit the CSV manually.
PST Import
Now it’s getting serious: We will start to import the PST’s from an Azure Container into the mailboxes.
The only supported way to get this done is the method described here: Use network upload to import PST files – Microsoft Purview (compliance) | Microsoft Learn. Alex also showed you how to use it in the article which motivated me to write this series.
Unfortunately, we cannot use this method. Using the supported approach does not allow you to import specific PST Item Content (Source Folder within the PST) into a Target Folder of the destination. Cause all of the PSTs we generated in Part I do not have Inbox etc on the first level, we couldn’t import the content and keep to the original folder structure.
Another problem, I have with the supported way, is that you do not have full control over the used azure storage. E.g. you can not remove PST Files from there, they will be deleted automatically after some time of inactivity.
These two reasons, and my will to get stuff done using automation, lead me to another approach that I’ve also used before in other PST-based migration scenarios. We use the command new-mailboximportrequest which is still available in Exchange Online. While we are to it OnPrem to import from local file shares, you can use it in Exchange Online also to import content from an Azure Storage Container. We’ve prepared this one and uploaded all PST-Files up to there before.
It’s not ideal that this method is not supported, but we’re using the same methods as the supported way. Also there an Azure Blob Container is used and a Mailbox Import Request is started in the Background. So, in general, it seems to work very similarly and from my experience, it’s working very straightforward. But as in every PST Import Scenario, it depends on the quality and integrity of the PST Files.
You find the Script here: thinBlog/import-pstfiles.ps1 at main · thinformatics/thinBlog (github.com)

You need to update the $containerURL and $sasToken URL. You can copy the values from your version of thinBlog/uploadTo-azure.ps1 at main · thinformatics/thinBlog (github.com) in which you’ve entered the container Infos while working on Part III.
Then define a cohort name that helps you to manage the pst import jobs afterward, and change the path to the mapping table accordingly. Maybe you also want to modify the limits $BadItemLimit and $LargeItemLimit.
When you have done that you’re good to go. Let’s have a closer look at some parameters and values of the new-mailboximportrequest command before you run the script:
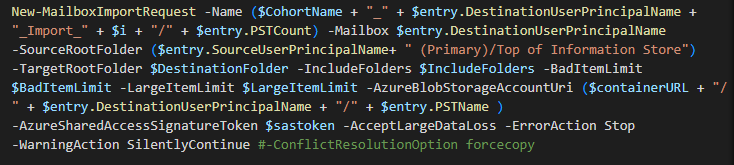
-Name: The Name of the MailboxImportRequest. The prefix of the job will be the cohort name, followed by the UserPrincipalname and the count of import jobs for this user. The Name and its parts will help you to manage masses of import jobs
-Mailbox: This value defines the destination Mailbox. It uses the mapping file content here to find the related destination
-SourceRootFolder: The result of our PST Exports are PSTs that contain a folder named with the Schema: UserPrincipalName (Archive/Primary)/Top of Information Store. We only want to import the content of this folder to the destination mailbox to recreate the content at the place where the user was used to.
-TargetRootFolder: With this Parameter, we define the destination. All content defined in SourceRootFolder will directly be imported here. Cause we want to recreate the folder structure ‚as-is‘ we set the value to ‚/‘ which stands for the ‚Top of Information Store‘-Folder of the destination Mailbox.
You should assure that the mailbox in the destination has the same language defined for the best possible result.
So, overall the script is connecting to Exchange Online, looping through the mapping table CSV, and starts a new Mailbox Import Request for every named pst. It uses the DestinationUserPrincipalName Value for the Mailbox mapping, the SourceUserPrincipalname for the SourceRootFolder definition, and the Value PSTName for the pst File Identification.
Please try it out with a small number of Test-Mailboxes to be able to react to typos in the Mapping Table or problems with the Folder structure etc.
When the script is finished you can check the jobs and their status:

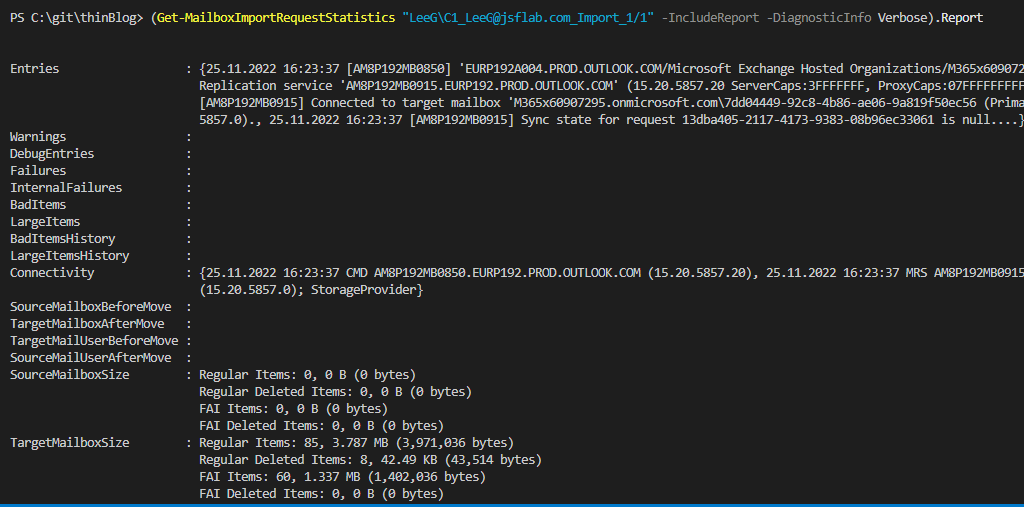
If you need to dive deeper for error analysis etc you can use these cmdlets to get details about an import job:
Where are we now?
After following the explained steps the user has the content of the PST (= the content of the source tenant mailbox) in its existing mailbox in the destination tenant. The user will be able to find all it’s content.

You could repeat a PST Import Job at every time – also after „refreshing“ the source PST – cause it handles dublettes etc for you if no big changes were made in the meantime in the destination mailbox.
In the last blog of this series, I will show you a way to reapply some of the users mailbox settings: Tenant-to-Tenant – PST based Exchange Migration automation approach – Part V
Other news