Tenant-to-Tenant – PST based Exchange Migration automation approach – Part II
In Part I of this series (Tenant-to-Tenant – PST Exchange Migration automation approach – Part I) I’ve described how to prepare a PST-based migration by exporting mailbox settings into XML files.
The next task is to export PST’s from the source. In our case, I’m talking about an Exchange Tenant-to-Tenant migration. So we need to export the PST’s from Exchange Online. In the good old OnPrem days we’ve used New-MailboxExportRequest to get this job done in bulk. In Exchange Online this is not possible anymore.
But we have eDiscovery. You can not only use eDiscovery to find and delete masses of emails within your environment (Typically these are some unintentionally sent mails from managers or frustrated co-workers 🙂 ), but you can also export the content of mailboxes to PST Files.
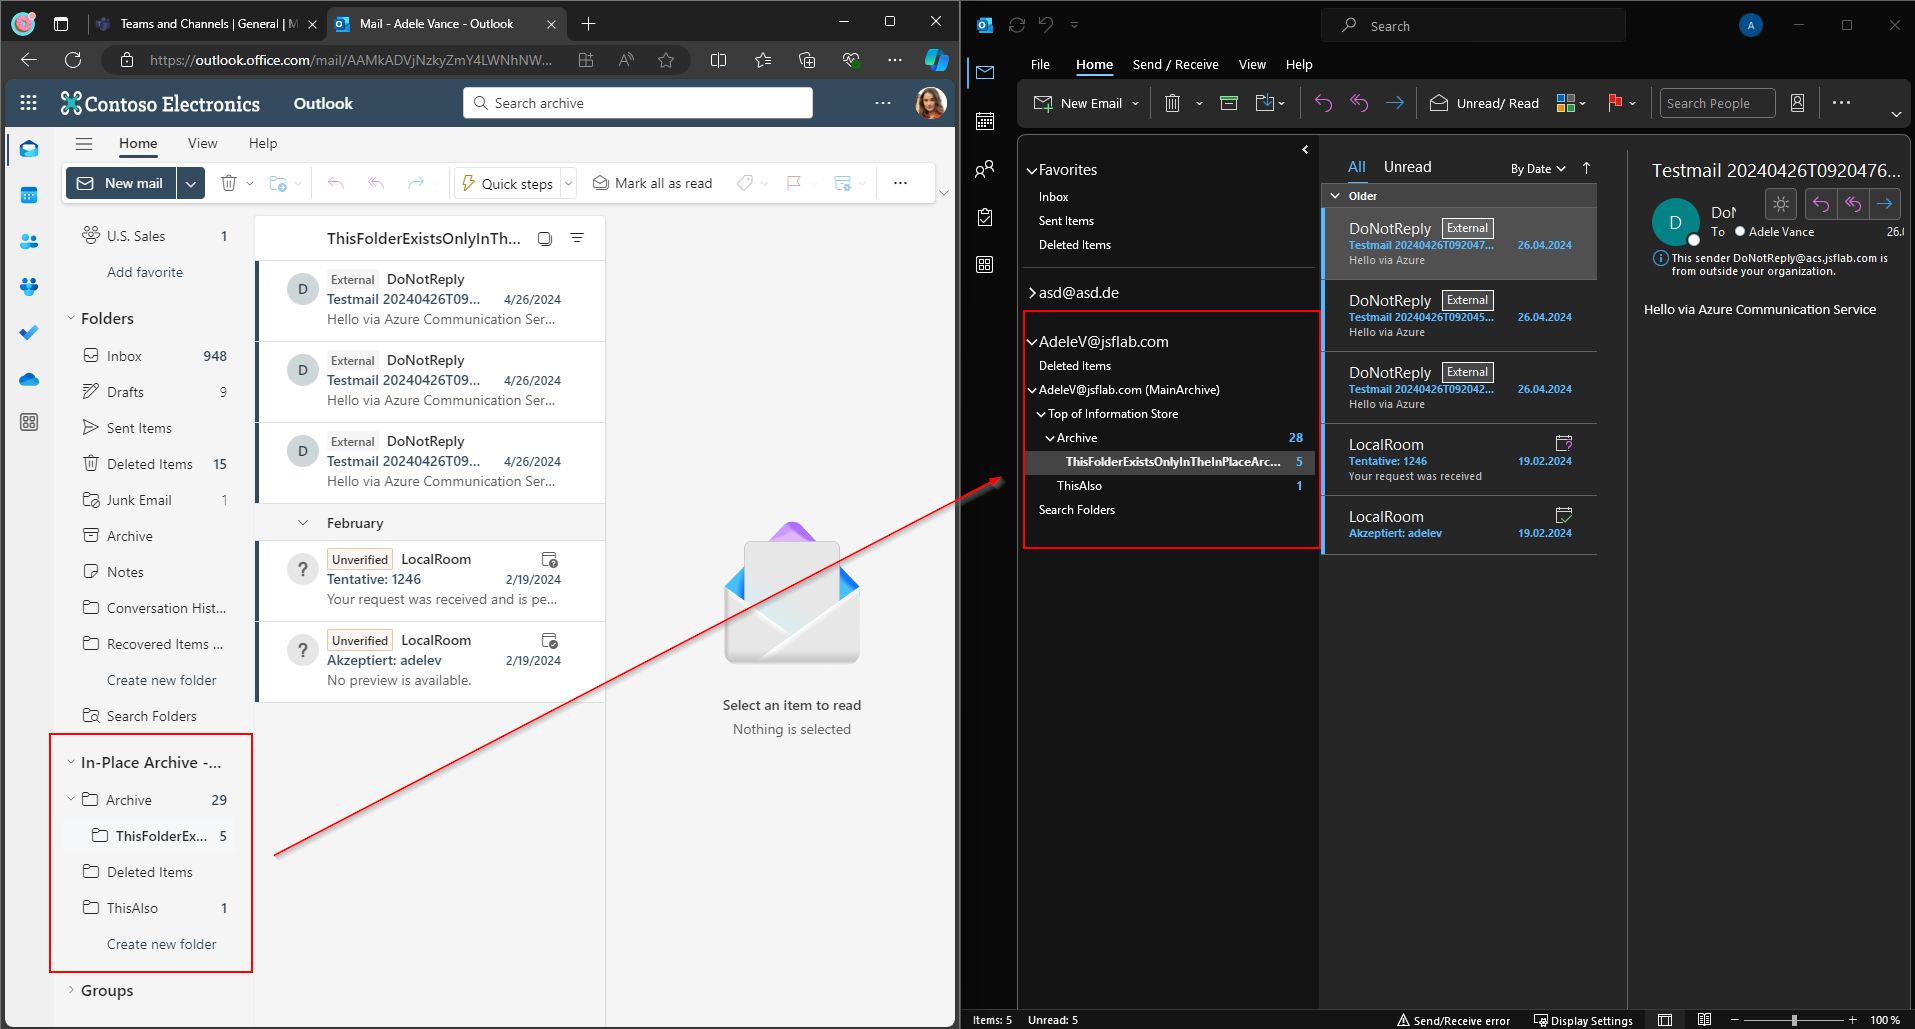
I was used to the fact that an eDiscovery results in a plain pst without the folder structure of the related user mailbox but on the occasion of Alexander Holmesets Blog and the following discussion on Twitter I tried it again and was surprised that it really results in a PST which will not only contain the mails, contacts, calendars, etc, but also the original folder structure.
So, the result will be nearly the same as the one we get when we use new-mailboxexportrequest on-prem!
Knowing that I’ve tried to automate the export overall, but unfortunately I failed to get this done 100%. But at least I was able to bring it to ~50% – I will come back to that later.
First, assure that you have the right to create an eDiscovery Case and that you were allowed to export the results. You need the eDiscovery Manager Role to get the following done. Alex explained in his blog how to assign that and here is a link to the official docs article: Assign eDiscovery permissions in the Microsoft Purview compliance portal – Microsoft Purview (compliance) | Microsoft Learn
Afterward, you can go on and create an eDiscovery Case. Within the Case you will create a search in which you define what you searching for and where (which mailboxes). Finally, you will define a Search Action to be able to export the Search results. <- That’s the automated part.
You can use these cmdlets to create the Search and prepare the Download:
thinBlog/CreateAndRunExportSearch.ps1 at main · thinformatics/thinBlog (github.com)
Just update the vars in lines 1-4 accordingly. in line 8 you connect to the Compliance & Security Center of the source tenant and wait for the search to complete. To run these cmdlets you need the Exchange Online Management module which still contains the commands for the compliance stuff.
When you processed the cmdlets above, log in to the compliance Center in the Purview portal: eDiscovery (Standard) – Microsoft Purview. In ‚Searches‘ you will find the search you just created via PS. If you navigate to the Tab ‚Exports‘, you can download the search action results (when the export is completed). Just copy the Export Key to your clipboard, click on Download Results and use the following self-installing assistant to download the results. <- That’s the part I was not able to automate.
What you have now, is a collection of PSTs for all mailboxes you defined in the Search
If you open one of the PSTs you will see a folder named like the primary SMTP Address, followed by a suffix that identifies if it’s the primary or the archive mailbox. Within that folder, you have the hidden folders which contain deletions, etc., and the Folder ‚Top of Information Store‘ which contains the regular mailbox content with the Inbox, Calendar, ….
Where are we now?
In this blog post, I’ve described a way how to semi-automate the PST Export. You can use the shared PowerShell cmdlets to cut and prepare your export tranches (by the way: the eDiscovery Limits allow you to download up to 100 000 exports in one Search).
You can also restart searches at any time to get the latest version of the source mailbox content and prepare the best possible result before migrating them anywhere.
With the Mailbox Settings, we collected in the last article and with the content exports we created now, we finished the tasks we had to do in the source tenant. Depending on your project timeline, requirements, and project planning (cohorts vs big bang) you can now move your mail domain to the other tenant.
In the next part of this series, I will show you an automated way how to upload the PST files to a repository from which we will import them into the mailbox.
Part III (Upload PST’s to Azure): Tenant-to-Tenant – PST based Exchange Migration automation approach – Part III
Outbreak automated PST Export download
As described above I wasn’t able to export the search action results automatically to pst’s. Why not I want to share here. Maybe somebody who reads this has some insights that could help to get this done completely.
As you see in the script I’ve shared above I am able to export the Container URL and the SAS token using the -IncludeCredentials Parameter within the New-ComplianceSearchAction command. That returns the key. With that, I’m able to download the Export Search Action Results in General to the local file system using azcopy.
I’ve googled a bit about it and opened threads od Twitter and Mastodon, but doesn’t find any process documentation of it. Because the additional value in this migration scenario is not really high, I didn’t dig further.


