How to build a simple Teams Inventory
If you’re reading this article then you might have the same need as me. I want to be able to check out which Microsoft Teams exist in my organization.
I want to know it because:
I’m an interested co-worker and want to be able to join Teams that handle topics that are also relevant to me.
I want to create a new team for Project X, but I’m not sure if not one of my coworkers already has created a team with the same intention or with the same name.
I know that there exists a team for a specific reason, but I don’t know how I should ask to invite me to this specific Team
I’m a person who feels responsible for governance or knowledge management and wants to know which containers of collaboration and knowledge were used within our company.
Some might say now that there is already an Inventory available. If you click on the Button „Join or create a team“ you see some Teams listed. But what you see here is a list of the public teams only. Public Teams are open to everybody without approval and only feasible for a few use cases.
Another existing workaround, that is often named, is the outlook address book and group functionality. You can use the Outlook Addressbook to list Microsoft 365 Groups and the Groups Section within Outlook to request to join. That works well in general. What I don’t like here is that it is a breach of the tools. Do you need to use Outlook to join a Team? Nah… Furthermore I miss an option to filter and group the Teams to find the Teams where I might be interested to join.
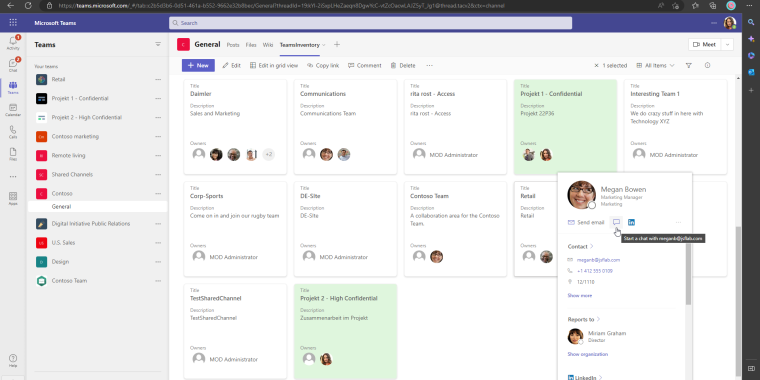
Today I want to show you another way how we could realize a Teams inventory that could be specialized for your needs. We use the native features and do not need expansive licenses to get it done. In the end, we will have a simple Teams Inventory that can be used by every user of the company. It will look somehow like this:
How to get there?
A short description of the following solution: A Logic App will crawl the Azure Active Directory in Intervals and find all Teams. The Logic App will create Items with some Metadata for every Team that it has found. The Items will be created in a SharePoint List. The SharePoint List will get some formatting and views. This List is the inventory that will be used by our co-workers to find Teams.
Create the List
Let’s start with building out SharePoint List. Do this in a Site where all org members have permission to access it or build a new site for it. I will use an M365 Group Site of a company-wide Team to host the List. Choose a name that contains no whitespace to avoid problems later. You can rename the list afterward.
List creation
Create the following essential columns:
Title (Text): recycle this default column to display the Team name
GroupID (Text): This column will contain the original ID of the Group that contains the specific Team
Description (Text): This column will contain the description that the Teams Owner/Creator has defined
Owners (Person, Allow Multiple Selections)
Column creation
Create an App Registration
To be able to read out teams and insert them to the SPO List with a Logic App, we need to build an authentication object first that we can use within the LA.
Create an Azure AD App Registration for this. The App Registration needs the Microsoft Graph application Permissions User.Read.All and Groups.Read.All. Create an Secret for this App Registration also and note it anywhere. Also, note the tenantID and the applicationID of the App Registration.
Creation of the App Registration
Create a Logic App
This will be the toughest part. The Logic App will read out the existing Teams, inject them into the inventory, and react to changes etc. Everybody who ever tried to build a synchronization solution knows the many bumps on the way. I decided to share a more simple approach that will only create new entries, delete orphaned ones, and update the rest of them nightly ignoring the fact that they maybe do not even need to be updated.
If you’re struggling with the following screenshots, can’t read an expression here, or lose track somewhere else while creating the LA, you can also download the LA Template from here. Feel free to check some expressions in there or just import it into your subscription to skip this chapter.
thinBlog/Template-LA-TeamsInventory.zip at main · thinformatics/thinBlog (github.com)
Now, go to an Azure Subscription and create a consumption Logic App:
Logic App creation
When the Logic App is deployed navigate to it and start with a Reccurence Trigger. We will update the Inventory once a day in this example.
Then initialize the following Variables and values:
TeamsInventorySite (String): The URL of the Site where you’ve deployed the list
TeamsInventoryListName (String): The Name of the list you’ve created to hold the Inventory
ExistingInventoryItems (Array): No initial value
AllTeams, ExistingInventoryItems, NewInventoryItems, InventoryItemsToUpdate, InventoryItemsToDelete, Owners (Array): No initial value
TenantID, AppID and AppSecret (String): With the values of the App Registration you’ve created before
Attention: To write down the AppSecret as PlainText directly into the LA is not a Best Practice. If you use this in a production environment you should store the Secret in a Key Vault, assign the Managed Identity of the Logic App as a reader for the Secret in the Key Vault and use a Key Vault Action in the LA to fetch the secret. I didn’t explained it here in Detail to focus on the main topic.
Now I’ve built a scope that contains a Get Items Action to receive all Items that are already stored in the Inventory SPO List. We parse the results (just for easier handling afterward) and store all Items in the Array Variable ‚ExistingInventoryItems‘.
In the next Scope we fetch all Teams that were deployed in the Tenant. We use the App Registration to authenticate within a HTTP GET Request. The Get Request is the following:
Check out the filter here. It allows you to fetch groups only that were provisioned for the use of Teams
Then we parse the results also for and append them all to the array AllTeams
Save here and test the LA to check if your authentication etc. works as expected.
Now we need to compare the arrays to check if we need to update, add or remove an entry to the Inventory. I build another scope for that, Here we loop two our the arrays we filled before. One array contains the items that are already within the inventory, and the other array contains all items that exist in the tenant. We use a ‚Filter array‘ action
First, we compare the existing inventory items with the Tenant items to find out which items we might want to update, and which we need to delete.
Then we do it the other way around to identify items that are not already in the inventory:
Now we identified what we need to do. So, let’s go! Let’s start with the creation of Inventory Items that were not already listed. To create the SPO items, I’ve used the ‚Send an HTTP request to SharePoint‘ to create the items via REST.
Then, to be able to display the Teams owners with their contact information I have to find the User SPO ID of every Teams-Owner (This action is the reason why everybody needs to be a member of the group that contains the inventory list.). We list their ID’s in the owner variable which we reset for every Inventory Item
If there is an owner which is not a member of the team and the SPO Owner request fails because of this, it’s very time-consuming cause the action is repeated 4 times with some pause between. That’s why I’ve changed the settings for the ‚Send an HTTP Request to SharePoint‘-Action.
Now that we have all owner SPO IDs we can patch the new item with them
The new items were in the SPO List now. Lets update the existing ones.
In this scope we loop through our array. First we fetch the relevant actual item from the AllTeams array. Then we search for our Owner ID’s again (same steps as above) and update our existing Items (Owner, Title & Description)
The final scope in the Logic App is for the deletion of Inventory Items of Teams that have been deleted
This is the easiest part, cause we do not need to check the owners etc:
Now, before you leave the Logic App, go to all of your loops that contain the owner variable and set the Concurrency Control to on and the value 1. You’re doing that to avoid issues with the multiple simultaneous usages of that variable.
And I’ve modified some ‚Run after‘ settings to ignore minor/temporary errors in earlier steps.
Ok, cool, now we’re almost finished. With the Logic App we’ve created before we care about the maintenance of the Teams Inventory SPO List. New Teams will be added, existing Teams will be updated, and deleted Teams will be removed with the LA.
Now we just add some formatting to make the inventory more usable. What I will do, as an example for the formatting, is to change the layout to a Gallery-Style and highlight the Teams where the accessing user is an owner.
You can modify the JSON of the View according to your needs to improve the highlighting etc. Just save the view and add the List to your company-wide Team and you’re done!
But it’s just a list ?!
Yeah, you’re right. It’s just a simple collection of the Teams without any fancy actions related to it. In this list, you have to use the built-in contact card features to e.g. contact the owner to request a team membership.
That might be already an improvement, but you maybe have imagined a greater ’smartification‘. But wait for it… The next blog that will follow soon (It’s here: https://blog.thinformatics.com/2023/03/teams-inventory-implement-membership-requests ), demonstrates a way how you can use this approach and include a ‚join Team‘ feature.
Another addition I want to share is the possibility to use Graph Custom Extensions to hide some of the Teams here and add some filtering options for bigger environments.
Further expansions which I plan to describe can help to improve your IT-Governance. You can e.g. prove the existence of more than one owner in every Team, or start some campaigns for orphaned Teams, just by combining this collection with some flows, etc. So many possibilities :)!


